Exploring PVRTexTool and texture mapping has always been a critical technique in improving the visuals of a video game at a low processing cost. It is achieved by saving surface-level detail as a flat 2D image that can be easily loaded from memory and applied to any object. Ever since the early days of Doom and Duke Nukem, immersion and graphical quality have always been paramount for game development. Realistic landscapes and highly detailed walls turned these games from just information on a screen into immersive 3D worlds for players to lose themselves in; this has been easily achievable with texture mapping.
The power of silicon hardware has risen dramatically over the years, particularly in GPUs, allowing us to store and display more information on-screen at once. Player expectations have grown even faster, and so texture mapping remains a key technique for increasing the quality and detail of a video game world with minimal power and processing overhead. It is a core factor that enables mobile gaming to match the visual quality of modern desktop hardware.
Why texture processing is important
Loading an image file from memory and then transforming and applying it to 3D models is, computationally, a simple-enough task. However, when multiple surfaces and textures need to be rendered at a time, pre-optimisation of textures allows for not only improved runtime efficiency but also helps avoid errors from unexpected rendering. This provides an extra safety net for both developers and graphical designers to ensure a smooth gameplay experience.
In this article, we’ll look at three techniques that are commonly used in the game development industry and how they can significantly improve the quality of a game’s graphics, or reduce the workload needed to produce a solid end product.
Mipmapping – easy anti-aliasing
Perhaps the saddest development for any artist is when effort is put into work that either goes unnoticed or gets lost. Developers, unfortunately, have little control over what is seen on screen and at what distance, meaning that, often, textures are rarely ever displayed at the size at which they were designed. Excessive stretching or shrinking of any image can cause either distortion or loss of detail. Depending on the image format and the graphics engine itself, the provided solution can range from not very effective to not existing at all. Slightly more intelligent systems can interpolate when magnifying an image, but shrinking will almost always remove features or detail. In some extreme cases, incorrect texture scaling can lead to aliasing: the distortion of patterns due to sampling and reproduction at incorrect detail.
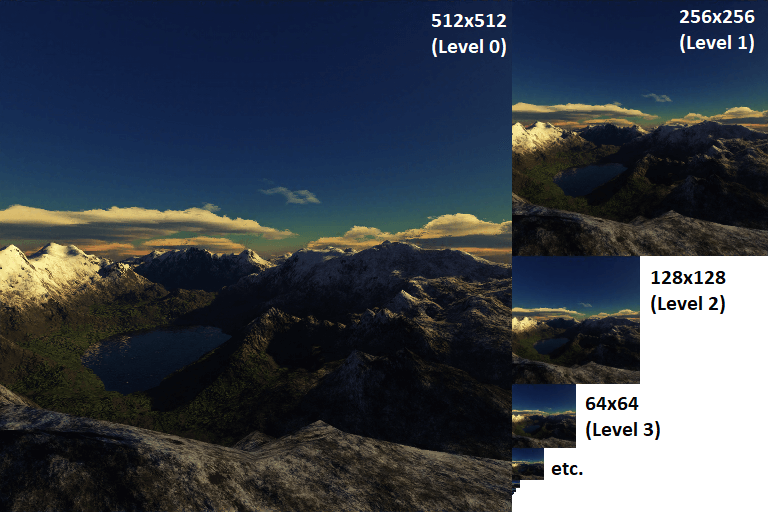
A mipmap is a collection of correctly scaled images, optimised and calculated beforehand. The idea is that by collecting the same texture at different resolutions in one place, unnecessary calculations to determine which texels contribute to which pixels on a screen can be avoided. This can also help to maintain some semblance of detail at lower resolutions that automatic computations would otherwise miss. Because the information is pre-allocated, mipmaps do take up slightly more memory overhead on disk – though only a maximum of 33% more. This is because each subsequent level in a mipmap has half the dimensions of the level before, making each level one quarter the size of the previous. In exchange, the level of computation needed for small objects rendered in the distance drops as smaller mipmap levels generally correlate to distance-from-camera. As well as this, while the memory storage overhead increases, the bandwidth usage drops, as rather than fetching the full texture data each time, the lower resolution data can be accessed instead. This has the added benefit of reducing cache misses, as smaller textures are more likely to fit in the cache. Image quality is also improved, especially as textures tend toward the horizon, where moiré patterns (interference patterns caused by slightly different linear patterns) would otherwise start to emerge.
Colour Bleeding – fighting off transparency issues
One of the largest challenges for graphic artists is anticipating where their textures will be used. Textures are often filtered and processed when being rendered on a screen due to the alpha channel providing an additional layer of transparency information on top of the basic RGB colour information. What this usually means is that when the texture is being drawn by the artist, even though the pixel shows as transparent due to the alpha layer, that pixel will still have an RGB value that is still processed. When the texture has to be sampled rather than directly displayed due to zooming, motion, or rasterisation, the RGB values of multiple texture pixels are combined through interpolation to generate the value of the on-screen pixel. These usually transparent parts of the texture image now have their RGB values included in the calculation of the surrounding area before the alpha is applied. This causes their “background colour” to “bleed” into the surroundings through alpha blending.
The following equation shows a rough approximation on how texture-sampling occurs across multiple textures, with omega being the weight of the texture, and RGBA being a one-dimensional matrix representing the RGBA values of the texture at that location.
![]()
The next equation shows the alpha blending equation and how the RGB values of an otherwise transparent pixel would factor into the output on the screen.
![]()
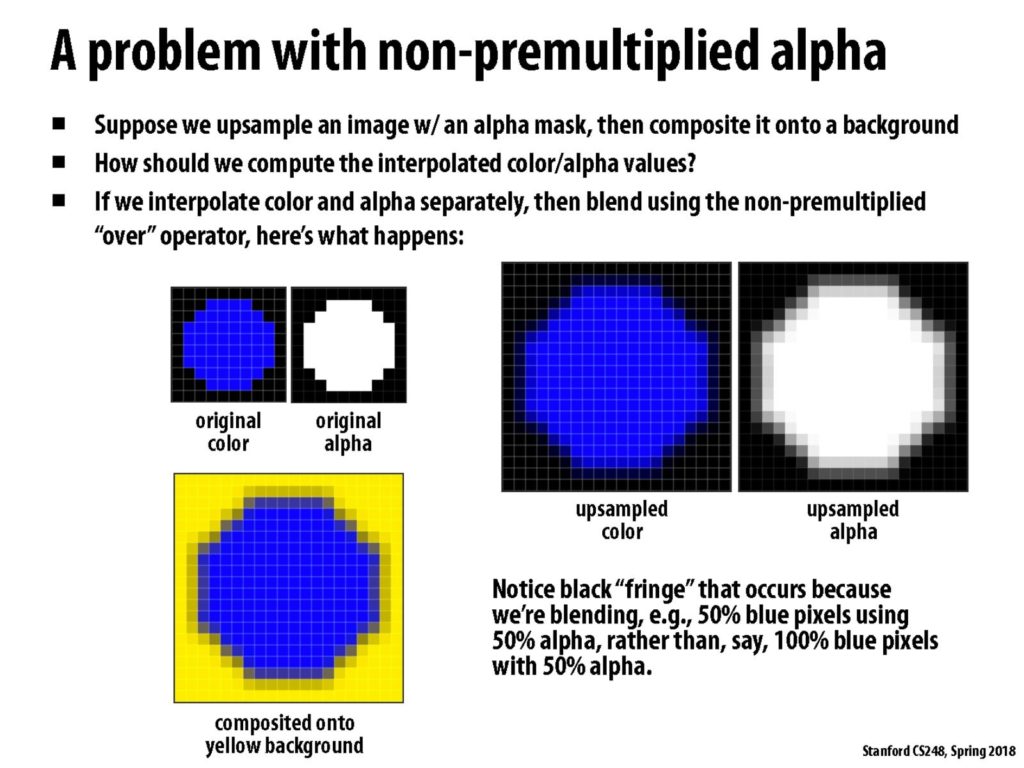
The common solution for this is for artists to extend the colour of their images beyond the border and into the transparency. This is also technically considered colour bleeding, so it’s certainly a case of “fighting fire with fire”! The reason this works is that even though the pixel is still considered transparent due to the alpha channel when it eventually bleeds into its surroundings during execution, it will at least bleed the same colour as the base image, thus causing the surroundings to be appropriately coloured. For example, if your texture was of a tree, it would make sense for most of your transparency to take on a heavy green value, so that the areas around the leaves contribute a green value during runtime blending (thus giving the illusion of either movement and afterimages, or a blurry “aura” around the leaves). It wouldn’t make sense, for example, to surround it with blue values under the assumption that the tree will be shown during the daytime, otherwise, you might end up with teal or cyan edges on the leaves during the evening!
The following slide from a Stanford University lecture highlights the problem perfectly.
Pre-multiply by alpha – simplify the calculations
Nowadays, most images are made up of many layers and contain a lot of complex colour information. For simpler textures, the RGB data can be separated from alpha much more easily. As mentioned above, alpha channels are often applied separately, and images often retain some RGB information. As a programmer, storing texture data in a pre-multiplied form is a much safer option than relying on your artists to bleed their colours correctly. Not only can you go back to the original image data by dividing by alpha, but it also ensures that every value in your texture has a matted layer applied to it that will allow it to be excluded from calculation. A pre-multiplied alpha also enables further benefits earlier in the pipeline, such as making it easier to generate mipmap chains or compounding multiple translucent images together. Lastly, pre-multiplying by alpha also reduces the number of calculations we need to do at runtime, as the blend function no longer needs to perform an additional set of matrix multiplications. The alpha blending equation now becomes:
![]()
We can also ensure that because the alpha is zero, the transparent regions are now just black RGB values, meaning they won’t affect the final output.
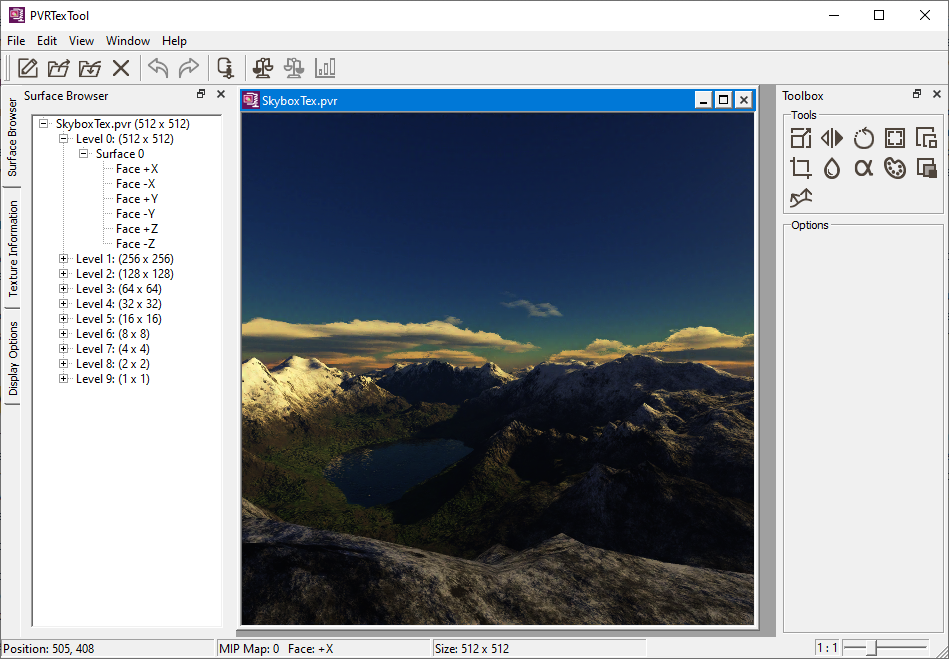
PVRTexTool is the solution
PVRTexTool is part of the PowerVR SDK and Tools that Imagination offers to developers to optimise their applications to work on PowerVR architecture. Despite not being deeply technical in nature, its users make it an invaluable utility. One of the strengths of PVRTexTool is that it provides all of the aforementioned functions simply and straightforwardly. With both a GUI for real-time visualisation on what’s going on, as well as a command-line interface for automated batch processing, PVRTexTool allows both programmers and artists alike to prep their textures ahead of time.
PVRTexTool uses .pvr – a PowerVR proprietary file extension that uses PVRTC to provide incredible texture compression capability – but also has support for a variety of other filetypes, including but not limited to; .ktx, .dds, .png, .tga, and more. We’ve also developed a handful of plugins for some of the more popular image editing software, such as Autodesk Maya and Adobe Photoshop, to be able to use our PVRTC format. Of course, PVRTexTool also natively supports most of the common texture formats for various graphics APIs such as Vulkan® and OpenGL® ES, as well as texture compression and encoding as output via PVRTC, ASTC and ETC. PVRTexTool brings together all the various tools and components into one place, allowing for multiple different optimisations and encoding all at once.
PVRTexTool’s strength doesn’t just end there – it’s also capable of other extremely useful functions, such as, but not limited to:
- Normal map generation
- Font-to-texture optimisation
- Texture array generation
For more details and for full information on what PVRTexTool can do for you, take a look at our main site for PVRTexTool, or better yet…
Try it for yourself!
The best way to learn is by doing, so why not give it a go? PVRTexTool is included as part of our SDK, and both user manuals and other helpful guides can be found on our documentation website. If you require any additional assistance, feel free to get in touch via our forum – we’re always happy to help.
.png)