After a couple of years of not being able to attend in person, earlier this year, Imagination was delighted to be able to send a team of both first-timers and experienced veterans to attend the Game Developer Conference (GDC) in San Francisco in March 2022. This mix of experiences proved to be perfect for a trip that was both enjoyable and productive for the Imagination team. As ever, the main aim was to connect with our network of partners, collaborators, and clients and to present our recent and upcoming advancements to other companies and game developers in general.
The core of our discussions centred on our groundbreaking mobile ray tracing implementation and was the main theme of our presentation and our demo, which was created in collaboration with Amazon Web Services, who are one of the main partners in creating a new Open-source 3D Engine called Open 3D Engine (O3DE), that enables the use of ray tracing to dynamically compute global illumination in real-time.

The Power of Ray Tracing
Ray tracing is a powerful technology that allows developers to enhance video games, or indeed any kind of real-time computer-generated images, by computing how light rebounds inside a 3D engine’s renderer. The challenge is that it is computationally intensive, which is why the PowerVR Photon architecture inside Imagination’s IMG CXT GPU IP is so key in helping achieve the levels of power and bandwidth efficiencies needed to make these kinds of computations practical in real-time. IMG CXT represents the first Level 4 solution on the five-level Ray Tracing Level System.
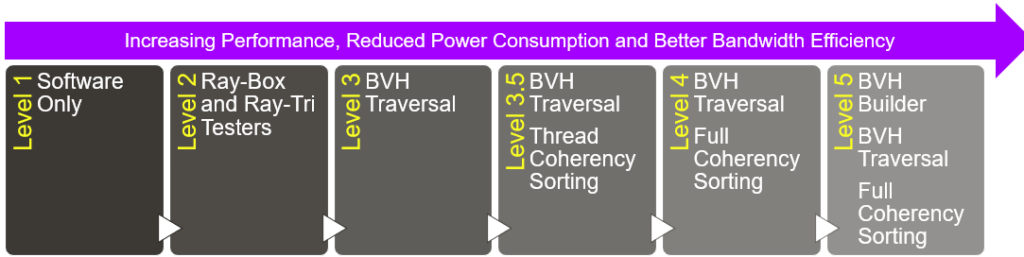 The Ray Tracing Levels System.
Ray tracing mimics how light works in the real world, where photons are emitted from a light source and bounced around the scene until they reach the eye of the viewer. Ray tracing can be used in several ways in 3D rendering to generate lights and shadows to make a 3D scene appear more realistic. While ray tracing in games is often used to create realistic reflections if it’s used for global illumination (GI) it can truly mimic how a 3D scene would look in the real world.
Based on another (probe-based) way of calculating and using secondary light bounces inside the scene, global illumination tells the renderer which parts of the scene environment are more in shade, more illuminated, and how the light diffuses between nearby objects (intensity and colour). To have a better understanding of the visual impact of both reflections and GI, take a look at our ray tracing demo created to launch the IMG CXT GPU, where the differences they bring are very noticeable. It demonstrates how GI can be much more effective at creating realism than just using reflections.
So, how does our presentation, and the demo we showcased for GDC, help?
We started on our O3DE demo in July 2021, straight after we got in touch with the developers after their presentation at O3DECON. O3DE is an evolution of Amazon Lumberyard, donated to the Linux Foundation, and developed and maintained ever since by a committee of partners and the general public. We spent the first month evaluating the capabilities of the engine in a long-term view, figuring out what possibilities it could provide to our demo team.
We discovered that the engine can use ray tracing to dynamically compute GI in real-time, so we decided to use this as the main feature for our upcoming demo. From there, a strong collaboration with AWS developers started, and we helped each other; we tested the engine and provided continuous feedback to the developers and based on this feedback they implemented some missing features.
The result was a graphics demo that we called “Buon(GI)orno”.
 A representation of how GI reacts to real-time changes.
As the engine was in its early stages the project did present some challenges for our artists and graphics engineers. However, with time and patience (and a sense of vision), we managed to synchronize and then channel our efforts together into the AAA engine that is now remarkably easy to use.
Without further ado then here is the “BuonGIorno” graphics demo. It’s a stylised representation of a small Italian-like village and shows how global illumination works in real-time using ray tracing.
Section 0 – Buongiorno!
The clip is the updated version of the demo we showcased at GDC and below we will explain what is happening on the screen (YouTube timestamp links available below):
– 0:00 to 0:15:
Introduction.
– 0:16 to 0:28:
Basic feature description.
– 0:29 to 0:51:
Colour diffusion and Light occlusion.
– 0:52 to 1:05:
Impact of RTGI on the full scene (ON/OFF).
– 1:06 to 1:28:
RTGI effect is handled dynamically and in real-time by the engine, thanks to ray tracing, when materials and light conditions change inside the scene.
– 1:29 to 2:00:
Scene showcase, powered by Imagination’s PowerVR Photon architecture + hybrid rendering, using O3DE.
The First Approach to the Engine
We’ll start with a brief introduction to the team tasked to work on O3DE. They are a collection of artists and engineers, whose role is to showcase innovative technologies and features through graphics demos. They benefit from using new software, as it helps them enhance their visuals, while the company benefits from collecting performance data which gives a representation of how they will run on our hardware when implemented in shipping devices.
If you’re interested in O3DE then getting started is simple. You download the engine from O3DE’s website choosing between the stable build or the nightly build installer, which contains the most recent updates. As with anything new, the first steps may be daunting but don’t worry, persevere and you will feel comfortable with it in a short time.
The developers are working hard on implementing changes and updates based on the community feedback (ours in particular: as early adopters of the engine we have collaborated closely with AWS, one of the major O3DE partners) and provide documentation on how to use the features. So, after testing, what does O3DE bring to the table? Well, O3DE has all the familiar features that are typical of other game engines, such as a multi-threaded renderer, a data-driven animation system, a real-time physics engine, and more.
As we mentioned above, what makes O3DE stand out is, unlike other game engines, it can use ray tracing to dynamically recompute GI in real-time, making it a perfect partner to demonstrate the capabilities of our hardware ray tracing capable IMG CXT.
GI aside, I’ll now cover several other topics to show how easy it is to get acquainted with the engine and to give you some tips based on what we learned during our journey of making the BuonGIorno Demo.
The Creative Workflow
I can never stress enough how important it is for developers to have clear ideas starting from day one of a project. Making a demo or videogame is an arduous process, so you must have a concrete vision from the very early stages to get a good result. This means understanding the purpose of your project. For example, the main goal of our demo was to show how by using ray traced GI, vibrant colours diffusing from objects can dynamically affect the surrounding environment lighting and nearby entities in real-time That’s how we came up with the idea of creating a small Italian-like village with colourful houses.
 Material switch affecting secondary light bounces through ray traced GI
We started by gathering references and producing a first draft of the scene (or layout) made of white boxes, and we then iterated on the same idea, implementing simple animations and basic technical features. This way you immediately have an idea if your concept is working or not and how feasible it is. After this is done and approved, we got going with producing the assets that were required to compose the scene.
The first stage is modelling the assets. You can even use photo scanning or other techniques but be aware that game engines often require you to produce well-optimised assets, so you need to be careful about a few things.
- Keep an eye on the polygon count.
- Take care of the topology of the model.
- Assign smoothing groups based on your UV seams.
- Regulate the distribution and spacing of the UV islands to avoid colour bleeding.
Reaching this level of optimisation means that you will be able to make a clean high-poly to low-poly “bake” (which means projecting details from a high-poly sculpt to a low-poly version of the same model via certain map channels, such as bump, normal or height). This is essential for the asset to be considered ready to receive animations and textures.
Speaking of this, let’s jump into the next part of the asset production pipeline, which is creating texture maps and materials.
Currently, the O3DE workflow for physically-based-rendering (PBR) requires you to have independent texture maps for every material channel. However, in a future update, the developers are working on providing the possibility of using a technique known as “texture packing”. Apart from that, the number and type of texture maps to export depends on your requirements from a shader. Indeed, not every shader is optimised for the same use or requires the same kind of textures.
For example, when creating a new PBR material, O3DE allows you to choose between different shaders, each one supporting a different variety of features and texture maps. This way you can decide which one better suits your needs. One thing I want you to notice between these different versions of PBR materials in O3DE is that all three of them offer support for “Irradiance”.
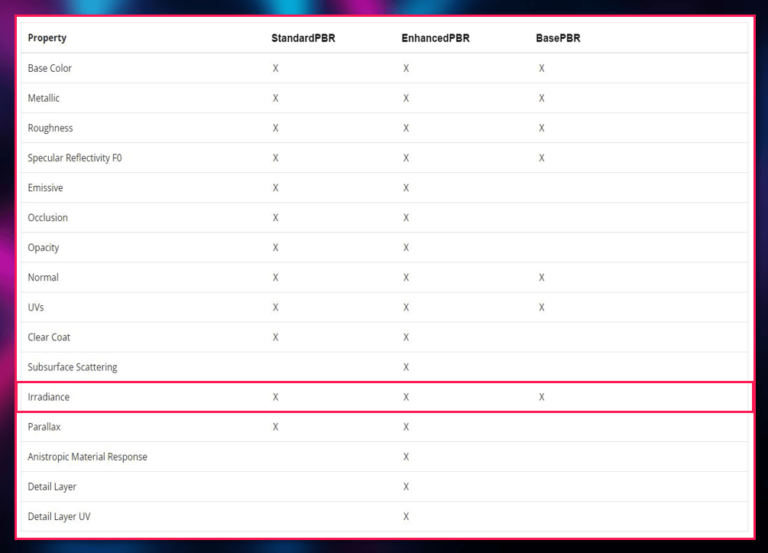 Irradiance in the different PBR Material presets in O3DE
This must be quite important if you can find it in all three of them, right?
Right! This is because Irradiance in O3DE is the channel that determines what colour diffuses from that specific material when using GI with a “multiply” value to manage the intensity of the colour diffusion. It’s something you need to care about when implementing GI.
Let’s move on to the next section, which will be about assets and feature implementations in O3DE.
Assets and Feature Implementations in O3DE
How to populate your level with assets is the first thing you need to understand to start visualising your demo or videogame. You simply drag your FBX or GLTF file (the industry-standard file formats for 3D files) from the asset browser inside the scene and an “Entity” with a Mesh component will be automatically created. From there, you can start adding “components” depending on what purpose each asset will have in the scene. For example, making your level feel alive is one of the most important things to achieve in a demo or a videogame, so you will need to know how to implement animations at a certain point for some of your objects or characters.
O3DE has two different approaches to animations, one that is most suitable for skinned (deforming) objects and one for non-skinned ones. The first method involves the use of an Actor component together with a Simple Motion component, or a movement system created inside the O3DE “Animation Editor”. If you don’t need your entity to be skinned, you can use the Track View editor and create Sequences, where you can “keyframe” your animation straight into the editor. The choice depends on your needs, but be aware that there is still no support in O3DE for skinned objects to actively affect GI. This feature is still a work in progress for the developers and they are looking to implement it soon.
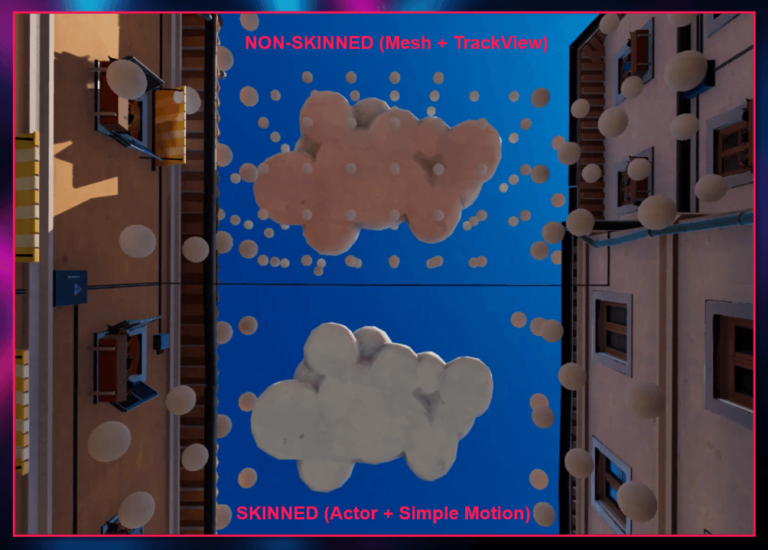 Non-skinned objects affect the real-time activation of ray-traced GI probes, while skinned objects do not.
Talking About Prefabs
Prefabs are a special type of component that allows fully configured game objects (“Entities” in O3DE) to be saved in the project for reuse. These assets can then be shared between scenes, or even other projects without having to be configured again. This is quite useful for objects that will be used many times; therefore, they are critical, especially on modular or procedural approaches to level creation. O3DE revolves around prefabs and even your level is automatically set to be a prefab.
 The power of instantiating game objects (entities) using Prefabs
Prefabs are easy to create in O3DE: you do it by right-clicking on an entity – you then have to decide where to store it in your project. You then simply access them from the “Asset Browser”, copy them and edit them from the viewport or the outliner by double-clicking on them. You can now reflect your changes from one prefab to all the instantiated copies with just a couple of clicks!
We are now at the point where you know how to implement your assets in the editor – but what is a demo, or a videogame, if you cannot see it? Therefore, the next topic is lighting. I’m not going to focus on basic lighting features, but I want you to know how to apply GI
GI in O3DE is powerful. First, it can work with more than one light source at a time if required, accounting for directional lights, point lights, spotlights and area lights. Next, it can compute secondary light bounces, both dynamically for those of you with hardware ray tracing cores at your disposal, or baked as a single interaction of probes with the light sources. Third, and most importantly, GI is also easy to set.
What you need to do is the following:
- Start by going to your “LevelName.prefab” and add a component called “Diffuse Global Illumination” to it.
- Select the GI quality level you would like to have in the scene.
- Create a new entity and add a “Diffuse Probe Grid” component to it (O3DE will ask you to create also a “box component” to determine the volume boundaries where the probes are going to be contained and distributed).
- Define the boundaries of the GI volume by setting its dimensions and moving it where you need it inside the scene (it must fully contain the entities that you want to be affected by GI).
- Start tweaking the GI parameters, like the Probe Spacing, “Number of Rays per probe”, “Ambient Multiplier” (should be kept to 1), and the biases. You can help yourself reach the right balance between these parameters by activating the visualization of the probes (“show active/inactive probes” it’s a recently added feature in O3DE).
- Make sure that the GI entity is active, that the mode is set to “real-time (ray traced)”, and start playing with entities, lights, materials and animations inside the volume influence. You will notice that the GI adapts in real-time to your changes, providing a better environment lighting overall. This is the power of ray-traced GI.
- Any of these steps and settings can be reviewed and modified at any time.
Finally, I want to talk about how to finalise and export your project.
Something to note when finalising your project is post-processing. Setting post-processing FXS is straightforward: it requires a “PostFX Layer” component to be added to an entity, and from there you can start adding every other singular effect component to the same entity. Currently, there is support for FX features such as screen-space ambient occlusion, automatic or manual exposure control, HDR colour grading, chromatic aberration, bloom, and many other things.
Other features, such as ray-traced screen-space reflections, are something that the O3DE developers are working on and hopefully will be implemented shortly.
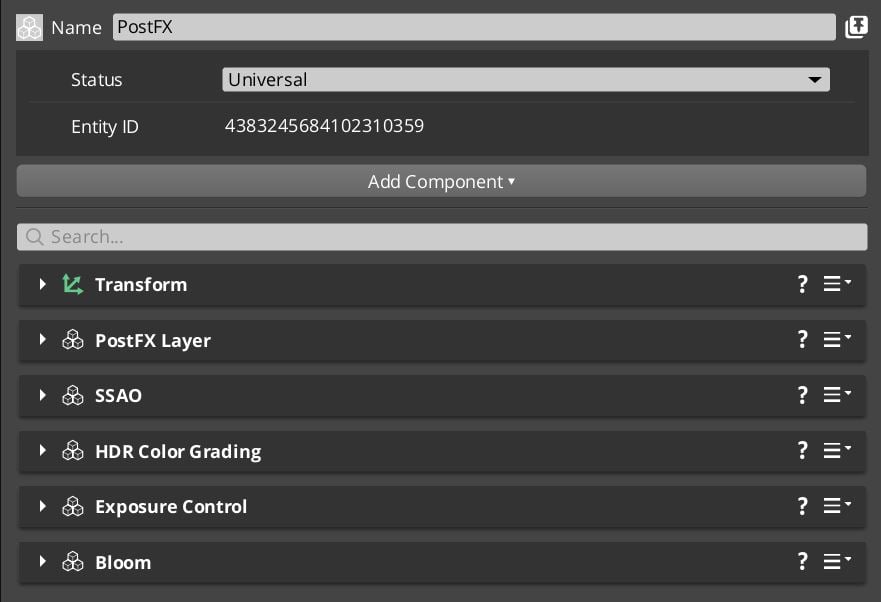 Some of the available post-processing effects are implemented as “components” inside an entity in O3DE.
Testing and Exporting Your Work
The O3DE editor offers the possibility for playing and testing your level at any time, keeping track of the vertex count, primitive count, draw items, and monitoring your FPS rate. Along with the play button, there is also a physics simulation button for those of you that will want to experiment with that feature.
To export your work, (specifically videos such as the one for our demo) you can set a “camera director” from the Track View and create your final playable sequence. From there, you will be able to record your videos directly in the engine.
Conclusion
You now know nearly everything that we learned about O3DE while creating our BuonGIorno demo. In essence, what we wanted to showcase is how easy it O3DE is to implement both familiar and amazing new features to enhance your visuals in demos and videogames. With a focus on global illumination rather than just reflections, we have learned how ray tracing will empower current and next-generation developers to produce better, more realistic, environment lighting.
While there is currently no option to run both ray-traced reflections and ray-traced GI together in real-time in O3DE as I have mentioned several times the developers are working on it! Thanks to their efforts, and thanks to Imagination’s PowerVR Photon architecture for mobile and desktop these features will shortly become standard in the world of videogames and real-time CGI, giving everyone better-looking visuals to enjoy.
.png)